Before You Start:
Instrument:
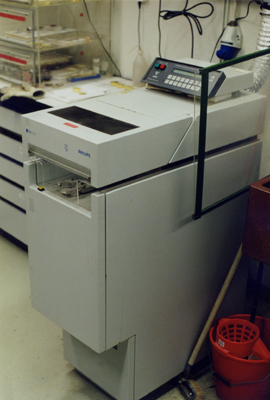
We already casted over 3500 glass beads using the automated glass bead casting machine "Perl X'3" of Philips AG:
|
Instruction manual Perl 'X3
- Automated glass bead casting machine - |
The machine must never be loaded with more than 6 g total mass (powder + flux). Otherwise the melt will overflow upon casting and the machine will be damaged. In the most fortunate case one only gets an inhomogeneous glass bead.
Operation of the machine is done through simple menus on the display of the operation microprocessor.
On the display, 'WAIT...' is shown (self test is being conducted). After this, 'SEARCH FOR VERTICAL POSITION....' is displayed, indicating the automated calibration procedure for the setting of the agitation unit. Machine cover and crucible lid open automatically.
The Perl X3 now conducts a self-test of the electronics and the supply lines (cooling water and air) after the start-up. If the settings do not meet the requirements, the start of the machine will be interrupted automatically. The operation microprocessor gives an error message (for how to get out of the error menu- see below).
In such a case, please first check if cooling water und pressurized air valves are on. In any case, restart the machine after this. It may happen that the pressure in the cooling water lines is momentarily unstable. If this does not help, stop working and indicate the error to the lab assistant.
After start-up, a total of three main menu pages with different submenus can be used. Move between the pages with the ù and ü buttons.
Operate as follows: press the "down arrow" button until the second main page is displayed:
| PROGRAMMING [1] COOLING [6] SELECT [2] DISH [3] CRUCIBLE LID [4] COVER [5] |
The menu options 'Crucible Lid' and 'Cover' (buttons [4] and [5] ) open and close the covers/lids. 'Dish' (button [3] ) changes the casting dish position (turn by 180°, vertical axis). 'Cooling' ( button [6] ) activates/deactivates the pressured air-cooling of the casting dish. Only authorized persons can use the menu option "Programming" which is password secured.
The menu options on the third main menu page ('Dish [1] or [2]'; 'RS232'; 'Delete Program'; 'Fusion Counter') are not of any use for the 'normal' user. They are only being used for programming and maintenance purposes. Do not change any settings in this menu.
To choose the desired program:
Activate the 'SELECT' ( button [2] ) function by pressing the number 2 key on the keyboard. You will be prompted to enter a program number. Press the corresponding program number (see below) and then 'ENTER'. The operation microprocessor automatically displays the first (main) menu page again
| SELECT PROGRAM : 4 START SELECTED PROGRAM [START] |
After the words 'Select Program', the last used program number is displayed (in the above case, #4). For glass bead casting, four programs are currently programmed:
If you want to cast different rock compositions, you must seek advice with the lab assistant first. Before using the carbonate program, you must also consult the lab assistant. The following materials are not allowed for processing:
Use of these materials lead to partial destruction of the platinum dish and crucible. A separate preparation protocol for rocks with oxidic ore content >3%vol and <15%vol (dilution with standardized quartz powder, max. 1:10 for qtz : spl) exists and has to be individually approved of by the lab assistant. No guarantee can be given for its success. Sulfidic ores over 5%vol can be casted under certain circumstances, but only for later analysis by LA-ICP-MS.
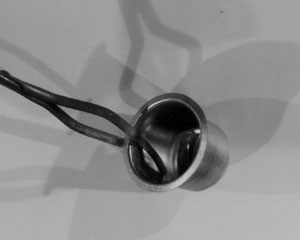
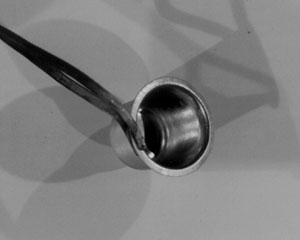
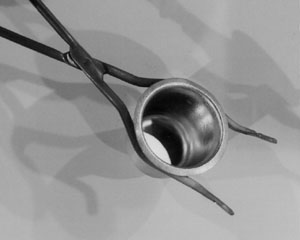
Place the crucible containing the powder into its holder. Take care when placing it: the holder is extremely hot if the machine has just been used before. Always use the special crucible tongs but never let the tongs touch the inside or upper rim of the crucible! Only touch the outside. Melt drops will be almost impossible to remove from scratches and will contaminate further samples.
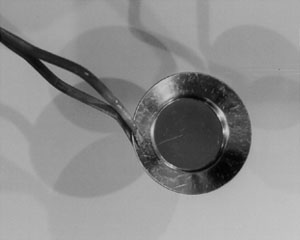
With the same tongs, touch the casting dish on the rim only, but never on the casting surface. Any scratches will be on the glass bead measurement surface also, and will cause the incident X-Ray beam to be out of focus. Open the front dish holder with one hand (can be hot) and place the dish into position. The upper notch of the three holder pins is where the dish goes. Make sure the holder encloses the dish safely. The machine will rotate the dish into casting position after start of a program. Choose the desired program (menu option 'Select') and then press the yellow 'Start' Button on the upper front of the machine. From here on, everything is automated.
During operation, the main individual program steps can be read from the display:
PGM: (NUMBER) (PROGRAM STEP)
|
PGM indicates the number of the active program, followed by display of the program step conducted ('First Fusion', 'Second Fusion' etc.). T indicates the remaining time until completion of the active program step, TR that of the entire program with subsequent air-cooling. Temp shows the current temperature on the crucible outer wall by optical measurement with an infrared pyrometer. It is not possible to measure temperatures below 550 °C with this device; the machine displays this as <550 °C.
The currently available programs comprise the following steps:
Never touch the slightly convex side of the glass bead with your fingers. You will experience elevated sodium values in your analysis. If it occurs, gently wipe the surface with a soft Kimwipe with alcohol.
It is possible to program and operate the machine so that glass beads can be produced without interruption (i.e., the new casting process starts while the prior glass bead is still being air cooled). This requires an additional programming step that can be utilized by experienced users upon request from the lab assistant, provided a second casting dish is available and the machine runs trouble-free.
Please be cautious that no new casting process is to be started while the old glass bead is accidentally still in the casting dish. If this is the case and a new melt is being poured, then the melt will spill over the rim of the casting dish and will damage the machine. In case of a program begun with a still remaining glass bead in the dish, just shut off the machine during the program with the red OFF button. The machine does not have a spill auto-shut-off.
For use of the machine, one casting dish and several crucibles are handed out to the user. This is to ensure a continuous use of the machine.
Cleaning
During run of a program, the last used crucible is placed in warm (not boiling, ca. 80°C) hydrochloric acid (HCl 5%). 5 minutes are enough to clean the crucible if it has been temperature-shocked properly in the ultrasonicator bath. A hot plate (set dial to 6), glass beaker and acid are in the lab.
Under normal conditions of use, the casting dish doesn't have to be cleaned by this procedure. It is only placed into the acid after the last sample for a few minutes.
This is mainly to keep the lower side of the dish clean and reflective. The rotation of the dish holder from the cooling to the casting position and back, the casting dish temperature and the detection if a dish is in the holder is by an optical sensor that requires reflection on the lower side of the dish.
Never place the dish into the acid bath together with the crucibles! Their rims would scratch the inner casting surface of the dish.
If the room is left for any short time, switch the hot plate off and leave the platinum in the acid bath. Switch the main gas supply off if you leave the room (in door frame, red button = OFF).
Waste acid has to be poured into the white 10 L waste acid container next to the sink. Place container into the sink, unscrew top, pour waste acid in (GLOVES, SAFETY GOGGLES, LAB COAT!!!). If the container filling reaches the marked top level (ca. 10 cm below top), inform lab assistant for proper disposal. Do not pour waste acid into the sink. NEVER pour water into the waste acid container, explosion hazard !
Proper Handling:
Under no circumstances are the inner parts of the crucible or the casting dish ever to be touched by the tongs!! Even slightest contacts scratch the platinum surface. On these scratches, small melt drops remain, leading to lesser quality melts and contaminated glass beads. The platinum crucibles and/or dish would have to be replaced which takes about a month and is extremely expensive (ca. 5000, - CHF per item!).
 |
 |
||||||||
|
WRONG !!
|
WRONG !!
|
||||||||
 |
 |
||||||||
|
|
|
||||||||
After extensive use, the casting dish will deform to leave a convex surface on the analytical side of the glass bead. Scratches and uneven surface can be flattened and polished by about 4 hours work. Uneven surface leads to a defocused incident beam during analysis.
Even though the machine is in use since 1995, casting problems may still occur. The experience of the last years led to many sometimes-funny incidents and improvements in this current protocol. Please always notify the lab assistant if obvious errors occur, so that further improvements can be implemented in the future.
Maintenance checks
Three maintenance checks are usually employed once a month or after the machine has not been in use for more than a day:
DISH DETECTOR TEST
Try running a program (e.g., #4) with a crucible, without sample, but without a dish. The program should abort automatically after a few seconds. It should give the error message NO DISH.
WATER FLOW TEST
Try running a program (e.g., #4) with a crucible, without sample, with a dish, but shut the water off. The program should abort automatically after a few seconds. It should give the error message WATER FLOW ERROR
AIR FLOW TEST
Try running a program (e.g., #4) with a crucible, without sample, with a dish, but shut the water off. The program should abort automatically after a few seconds. It should give the appropriate error message.
Error Messages
The machine gives clear error messages. All operations are automatically stopped if this happens. Is the source of the fault detected and removed, the machine can be brought back to normal operation mode by pressing the "up arrow" key twice, then the ENTER key.
Possible error messages and what you could do:
| FURNANCE COVER POSITION FAULT E1 |
Furnace cover is in wrong position.
Help: turn pressurized air on all the way.
| CRUCIBLE COVER POSITION FAULT E3 |
See above.
| WATER FLOW ERROR E14 |
Pressure of cooling water in (Kühlwasserzufluss) too high or too low.
Help: check if IN and OUT are all the way open. If this doesn't help, inform lab assistant.
The machine will abort all operations if this error occurs during run of a program. The melt can be recovered or casted by restarting the program again. The resulting glass bead has to be discarded though, because inhomogeneities and mass fractionation of certain light elements will become significant.
| NO DISH |
The optical sensor does not detect the casting dish.
Help: Place casting dish in either one of the two dish holders. If a dish was present, either the sensor is defect or the lower side of the dish is not reflective anymore. In that case, treat the dish for 5 minutes in the acid bath, rinse and dry, insert, and restart. In the case of repeated occurrence of this error message, inform the lab assistant.
| CRUCIBLE POSITION FAULT |
The crucible holder assembly does not find the vertical position.
Help: Turn off machine, wait 20 seconds and restart. In the case of repeated occurrence of this error message, inform the lab assistant.