Before You Start:
Instrument:
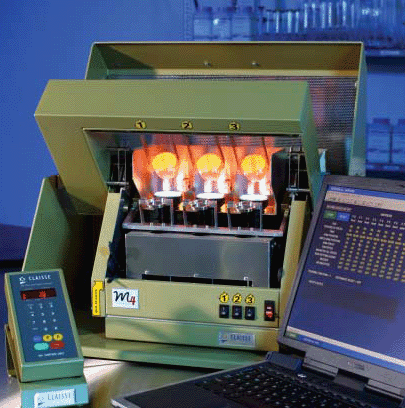
We started in March 2004 to cast glass beads using the automated glass bead casting machine "Claisse M4®" :
|
Instruction manual Claisse M4®
- Automated glass bead casting machine - |
The operation of the machine is done through a panel of the operation microprocessor.
The M4 conducts a self-test of the electronics and the supply lines (gas) after the start-up. If the settings do not meet the requirements, the start of the machine will be interrupted automatically. The panel shows an error message (how to solve problems see below).
In such a case, please try first to fix it yourself with the helping manual further on. If it is an extraordinary fault, contact immediately the responsible lab assistant
After start-up, a total of 10 main menus can be used. The most frequently used are mentioned above. For choosing a program, press ‘P’-Button followed by the wanted number.
If you want to cast different rock compositions, you must seek advice with the lab assistant first. The following materials are not allowed for processing:
The use of these materials leads to partial destruction of the platinum dish and crucible. A separate preparation protocol for rocks with oxide ore content >3%vol (dilution with standardized quartz powder) exists and has to be individually assigned by the lab assistant. No guarantee can be given for its success.
Changes on the working programs are only done by the assistant, because they are code protected.
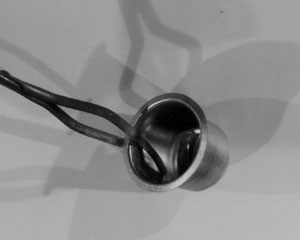
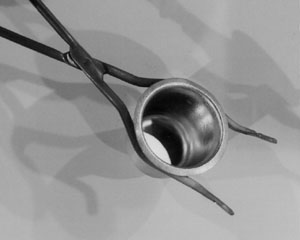
Place the crucible containing the powder softly into its holder. Insert the crucible from the top. With one hand, open the holder und put the crucible softly in between the triangle carrier. Check that the crucible is sitting correctly, wrong placed crucible could be scratched or fall out while rotating. Be very careful during insertion!!! If you have cast pills before, take care when placing the crucible, because the holder is extremely hot. Always use the special crucible tongs but never let the tongs touch the inside or upper rim of the crucible! Only touch the outside. Melt drops will be almost impossible to remove from scratches and will contaminate further samples.
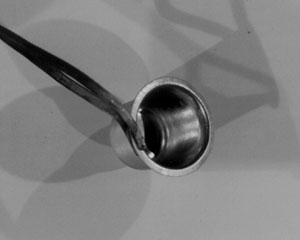
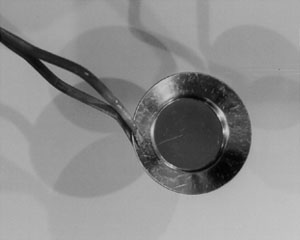
With the same tongs, touch only the casting dish on the rim, but never on the casting surface. Any scratches will be on the glass bead measurement surface, and will cause the incident X-Ray beam to be out of focus. Open the holder with one hand (can be hot) and place the dish from above softly into position. Make sure the holder encloses the dish safely and check the correct placement. Wrong placed casting dishes can be scratched or lost while rotating.
Topple over the pivot arm (position 20°above horizontal) into the right position. The machine will rotate the dish into casting position after start of a program. Choose the desired program (‘P+number’) and then press the green 'Start' Button on the panel. From here on, everything is automated.
During operation, the remaining time can be read from the display:
You can read the following details:
12.3.0 means the remaining time is 12min 30s.
F 4.32 means the used function remains for 4min 32s.
GO means the program has been started.
The currently available programs comprise the following steps:
Never touch the slightly convex side of the glass bead with your fingers. You will experience elevated sodium values in your analysis. If it occurs, gently wipe the surface with a soft Kimwipe dipped in alcohol.
For use of the machine, 3 casting dishes and 3 crucibles are handed out to the user. During the in between program time, the last used crucible is placed in warm (not boiling, ca. 80°C) hydrochloric acid (HCl 5%). 5 minutes are enough to clean the crucible if the antecedent program has been finished properly (this means, that the crucible has been shocked) and shortly placed in the ultrasonic bath. A hot plate (max. set dial to 6), glass beaker and acid are in the lab.
Under normal conditions of use, the casting dish doesn’t have to be cleaned by this procedure. It is only placed into the acid after the last sample for a few minutes. This is mainly to keep the lower side of the dish clean and reflective.
Never place the dish into the acid bath together with the crucibles! Their rims would scratch the inner casting surface of the dish.
If the room is left for any short time, switch the hot plate off and leave the platinum in the acid bath. As well switch the main gas supply off if you leave the room (in door frame, red button = OFF and green = ON)
Waste acid has to be poured into the white 10 L waste acid container next to the sink. Place container into the sink, unscrew top, pour waste acid in (GLOVES, SAFETY GOGGLES, LAB COAT!!!). If the container filling reaches the marked top level (ca. 10 cm below top), inform lab assistant for proper disposal. Do not pour waste acid into the sink. NEVER pour water into the waste acid container, explosion hazard!
Under no circumstances are the inner parts of the crucible or the casting dish ever to be touched by the tongs!! Even slightest contacts scratch the platinum surface. On these scratches, small melt drops remain, leading to lesser quality melts and contaminated glass beads. The platinum crucibles and/or dish would have to be replaced which takes a long time (>1 month) and is extremely expensive (depending on platinum price ca. 5000, - CHF per item!). After extensive use, the casting dish will deform to leave a convex surface on the analytical side of the glass bead. Scratches and uneven surface can be flattened and polished by about 4 hours work. Uneven surface leads to a defocused incident beam during analysis.
 |
 |
||||||||
|
WRONG !!
|
WRONG !!
|
||||||||
 |
 |
||||||||
|
|
|
||||||||
Because the M4 is new, we do not know all the established problems. Please tell us what kind of problems you had, so we can improve the programs or manuals.
a. The bead does not cover the entire floor of the casting dish:
b. Small melt remnants stay behind in the crucible:
c. The bead has a small gas bubble trapped in its rim:
d. The pill splits
The machine is given out 2 error messages (‘Fail’ or ‘Err?). If it displays these messages, all application stop immediately. After the error is eliminated, you can ‘reset’ the machine with pressing the ‘reset’-button and the machine is ready for the normal use.
Possible error messages and how to fix it:
ERR:
FAIL:
ARM7: